Busy May

In January I presented at the Sydney ALT.NET user group about HTTPS, focusing on all the new advancements in this space and some long-held misconceptions too. It was well received so I re-presented it at the Port80 Sydney meetup in March.

I met Steve Cassidy from Macquarie University who was also presenting at the same Port80 meetup and I was invited to present the talk a third time as a guest lecture to second year Macquarie University Computer Science students on May 4th. The lecture was filmed but is only available to those with a student login. My slide deck from Port80 is available on SlideShare though.

On May 19th I delivered a breakfast talk about my experience deploying some of section.io’s infrastructure into Azure. The video of this talk is publicly available and so are the slides.

This year my friend Aaron lead the organising of the return of the DDD conference in Sydney. I submitted a talk proposal and was fortunate to receive enough votes to earn a speaking slot. So, on Saturday May 28th I presented “Web Performance Lessons” which covered a variety of scenarios I had encountered while improving the performance of other people’s websites as part of my job at section.io. The talk was recorded by the conference sponsor SSW and is available to watch here. Also my slides can be viewed at SlideShare.

At the Port80 meetup in March I also met Mo Badran who organises the Operational Intelligence Sydney meetup. Mo asked if I could do a presentation of how section.io handles operations so on Tuesday May 31st I presented “Monitoring at section.io” where I shared a bunch of detail about our tools and processes for operational visibility at section.io, both for the platform itself, and for users of our CDN. Those slides are published on SlideShare too.

I’ll take a break from speaking in June and instead absorb what other people have to share at the Velocity conference in Santa Clara and take the opportunity to also check out the new section.io office in Colorado.

I know this blog has been quiet for a while. I have been posting most of my written content over at the section.io blog lately and will probably continue to blog there more often than here in the near future. Some of my recent posts include:

Adding HPKP to my blog

In my last post I described how I added HTTPS to my blog and mentioned that implementing HTTP Public Key Pinning (HPKP) was still pending.

The purpose of HPKP is to protect your site in the event that a trusted Certificate Authority issues a certificate for your site to the wrong person. This can happen, and has happened, due to a process error, or due to the CA’s systems being breached. Either way it can enable a 3rd party to Man-In-The-Middle attack your site with often no indication that something is wrong. HPKP allows you to inform the browser that only certain public keys that you’ve pre-approved should be accepted, even if all other aspects of the certificate appear valid.

The reason I didn’t get HPKP done up front is because the process is somewhat arduous even though the end result is simply serving an extra HTTP response header of the format:

Public-Key-Pins: pin-sha256="..fingerprint.."; pin-sha256="..another.."; max-age: 1234;

A single response header may appear trivial at first but there is some complexity waiting to trip you up.

Firstly, the fingerprint is different to any of the other fields you may normally see in a typical certificate information dialog. The fingerperint is a SHA-256 (or SHA-1) digest of the public key (and some public key metadata) which is then base64 encoded. To generate this fingerprint typically involves piping between two or more consecutive openssl commands and OpenSSL isn’t renowned for its clarity.

Starting with an existing certificate, a certificate signing request (CSR), or a private key will each change which collection of OpenSSL commands you need to execute to generate the fingerprint. There is at least one online tool to help with this (thanks Dāvis), but be wary of using any online tools which require the private key.

To make life a little easier for section.io users, I added the calculated fingerprint to the HTTPS configuration page:

section-hpkp-fingerprint

The second gotcha is that the header is not valid with only a single fingerprint of the public key from the certificate currently in use on your site. The specification (RFC 7469) requires that you also include at least one extra fingerprint of a backup public key that you can switch to in the event of a lost or stolen private key. And it is good idea to include fingerprints for two backup keys.

Before you assume that this means you need to buy more certificates, you should note that you only need the fingerprint of the public key component. This means you can generate a key pair, or a CSR, with which you will later purchase a new certificate only in the event that you need to replace your current certificate. Key pairs and CSRs do not expire – although, technically, your chosen key length or algorithm may become less secure as time passes and technology progresses.

The third issue to be mindful of is the max-age directive in the header. This is the number of seconds that a user-agent should cache these fingerprints. Do not conflate this with the validity period of your signed certificate, as certificates expire on a fixed date but the HPKP header is valid for a fixed period starting from the moment the browser parses the header.

With a max-age value equivalent to 365 days, a user could visit your site one month before your certificate expires and then persist your Public-Key-Pins header data for the next 12 months, well past when certificate’s validity. But this is OK. You will likely renew your certificate with the same public key, or renew it with one of the backup public keys already mentioned in your HPKP header.

It is just important to realise that the HPKP max-age is different from the certificate validity and browsers may limit the upper age limit. Ensure that you balance the age and the number of backup keys you think you may need in that age period. And when you consume a backup key from your HPKP header, you should update your header with a new backup key that will be slowly acknowledged by browsers as their cache of your HPKP header expires.

With all that, I added the HPKP response header to my site with the following Varnish configuration:

hpkp-vcl

Adding HTTPS to my blog, economically

I’ve been hosting my blog with WordPress.com for about the last five years for one simple reason: I want to spend my time writing content, not messing about with server maintenance or blog engine updates. If I was making the same decision today I might choose Jekyll or Ghost instead but WordPress.com was just easy and I have no reason to change. Well, maybe one reason…

Security has always been a passion, and these days it is a significant part of my job. I am a fervent supporter of HTTPS everywhere (the concept, not the browser extension) and I recently realised that my blog was not only served without HTTPS by default but it failed with certificate warnings when accessed via HTTPS. My first thought was to bump up my WordPress.com plan to something with TLS support but when I went looking for this option I found that not only do WordPress.com not offer this, they have published some dangerous misinformation about their HTTPS support.

wordpress.com-https

I wanted to avoid going through the effort of migrating my blog to new hosting. All I really needed was to put an intelligent HTTPS proxy in front of my existing blog. Conveniently that is a core component of what my team and I have been building this year: section.io. In short, section.io is a HTTP-reverse-proxy-as-a-service solution focused on a providing a great DevOps story. At the moment it is predominantly used for Varnish Cache cloud-hosting but its capabilities are growing rapidly.

With section.io I was able to register a new, free account and within about 3 minutes the infrastructure had been provisioned to proxy my WordPress.com-hosted blog through a default configuration of Varnish 4. For now, because WordPress.com do their own caching, and I want to focus on writing blog content, I’m leveraging Varnish only for response header manipulation, not caching.

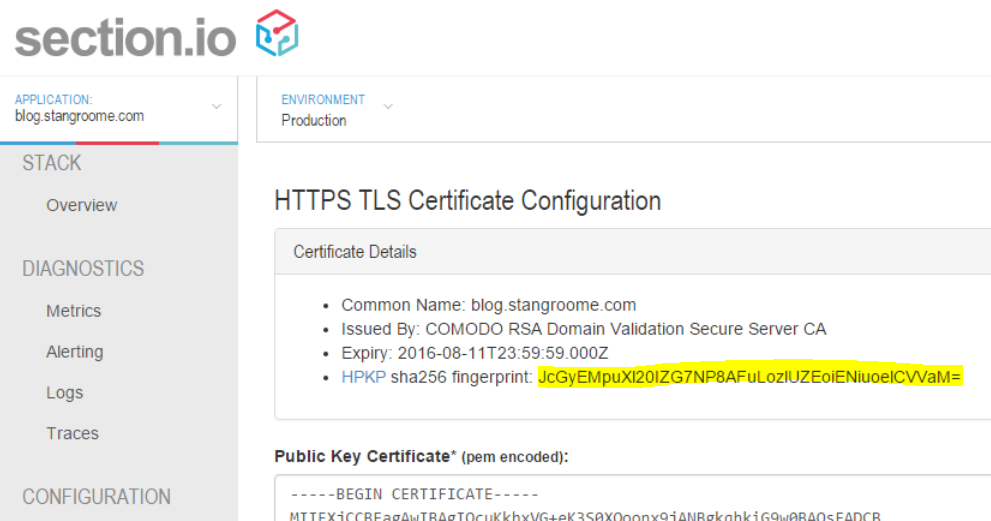
Also, because Varnish Cache (and inevitably other proxies that section.io will support one day) doesn’t have native HTTPS support, section.io provides a thin TLS-offload layer in front of Varnish, all I need to do is upload a certificate. For recent years, my DNS host and registrar of choice is DNSimple and they now sell TLS certificates too. Through DNSimple, I bought a Domain Control Validated certificate for only US$20 for the year, which is then issued by Comodo.

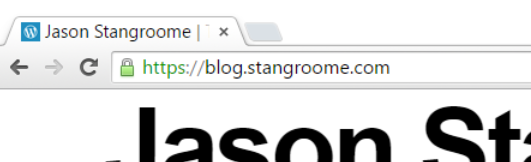
I uploaded my new certificate and private key into the section.io management portal and moments later my blog could be accessed via HTTPS and I was greeted with a friendly green padlock. I should point out that the free HTTPS support on section.io does not support non-SNI capable user agents at this time but I’m comfortable ignoring that quickly shrinking pool of browsers for my blog.

green-padlock

Merely being able to access my blog via HTTPS is not enough however, I want it to be accessed only via HTTPS so that requires a little more work, but its all achievable with a little bit of Varnish Configuration Language.

section.io strives to provide the same unconstrained Varnish experience one would get from hosting Varnish themselves. In this instance, I get access to the default.vcl file in my own section.io account’s git repository, and a convenient web-based editor to make quick changes.

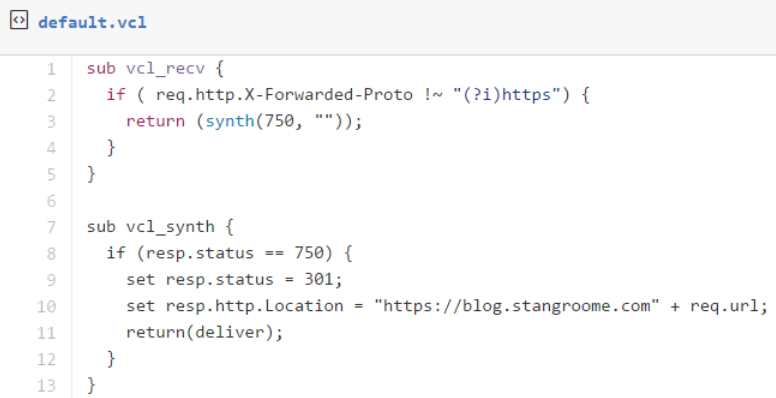
The first change is to add some VCL to detect whether the request was made without HTTPS, by inspecting the conventional X-Forwarded-Proto header, and respond with a synthetic 301 Moved Permanently response to the HTTPS URL as appropriate:

vcl-https-redirect

The second change is to add HSTS response headers so that return visitors will automatically use HTTPS for all requests without needing the server-side redirect:

vcl-hsts


At this point section.io is configured to serve my blog as HTTPS-only but public traffic is still hitting WordPress.com directly. When I registered my blog site with section.io I was provided with a new CNAME value to configure my blog’s DNS to resolve to. I didn’t change over immediately though, I used Fiddler (or my local HOSTS file) to simulate the change and verify I had everything working right. I’ve since changed my public DNS records and you should now be reading this post over HTTPS.

Troy Hunt has recently blogged about the generally “premium” nature of TLS being a blocker of wider HTTPS adoption, and he is right, but there are a number of more affordable solutions growing in response to the increasing demand. What I have found though is that the cost of certificates and hosting is quickly surpassed by the knowledge required to implement HTTPS right because it is so much more than just getting a key pair and talking HTTP through an encrypted tunnel.

A good HTTPS deployment needs to consider TLS protocol versions and cipher suites, needs to avoid mixed-mode content, and utilise HPKP, which I’ll be configuring on my blog soon. Some of this will hopefully be handled by your hosting provider but a lot also crosses over into the application domain.

One year in to the new world

My first anniversary of working with Squixa passed recently and I began to reflect on just how much working with an entirely unfamiliar technology stack has been different from working with the Microsoft platform, and how it has been different when compared to my initial expectations.

In the early weeks into the new job I began writing down the names of tools and technologies that I was learning each day but it quickly reached more than 50 long and I stopped updating it. Looking back at that list now, it has become a list of things I use every day, most have formed muscle memories, many I have read the source code for, and a number I have submitted patches to for bug-fixes or enhancements.

On the Microsoft platform I was a regular user and contributor to open-source projects on CodePlex and GitHub and more often than not I trusted .NET Reflector over documentation to better understand how some component should work. Over in *nix land though, source code is unavoidable, sadly sometimes as an alternative to documentation, but more often simply as the preferred distribution method. I’ve certainly read a lot more source code each week than I have previously, and in a wider variety of languages, and although it is sometimes tedious it has also taught me a lot. It’s not just developers that need a compiler installed but any user looking outside what their favourite *nix-flavour packages for them.

I was never particularly bothered by the lack of system package manager on Windows even though I’d heard its absence was oft-maligned by *nix folk. Having used a package manager in anger now, I can both appreciate just how much effort it saves when trying to automate machine provisioning but also found that there are many challenges with version pinning and when one’s chosen distribution does not stay current with new software releases. I’m sure the new Windows 10 PackageManagement (formerly OneGet) will be an awesome step forward for Microsoft in this space.

I wrote a lot of PowerShell before I changed jobs and I revelled in the language’s ability to work with objects and APIs. The typical shell in *nix lacks this but I’ve rarely had to deal with objects or APIs in my new job. Here Everything is a file and normally a plain-text file at that and so languages focused on text manipulation instead are ample. Configuration management systems end up spending most of their time overwriting files generated from templates instead of trying to interact with an API in some idempotent manner. Personally though, dealing with pattern matching and character- or field-offsets still feels too brittle and harder to re-comprehend later.

There are some popular applications in Linux doing some really awesome tricks. One favourite example is the nginx web server which can upgrade its binary, launch a new version of itself, hand-over existing connections and listening sockets and never drop a packet. It’s not that things like this are not achievable on the Windows platform, it’s just that for some unknown reason, nobody is doing it. While Microsoft is still fighting hard against a “just restart it” culture to avoid unnecessary down-time, Torvalds recently merged live kernel patching in Linux.

Ultimately though all the problems are the same across both platforms. You need to make sure you understand exactly what each application needs access to so you can constrain it to the least possible privileges – but not everyone does. You hit resource limits on process counts, file handles, network connections, etc but at different thresholds. You’re susceptible to the same failure conditions but they often have different failure modes, and rarely the one you would have preferred.

For every difference, there are double the similarities. The platforms have different driving principles guiding which solution to prefer for a given problem, but neither is necessarily better, simply idiomatic. At this point I’m expecting that I’ll continue to use whichever platform my current project requires without any favouritism and hopefully be switching back and forth enough to stay abreast of the latest developments on each.

Announcing VclFiddle for Varnish Cache

As part of my new job with Squixa I have been working with Varnish Cache everyday. Varnish, together with its very capable Varnish Configuration Language (VCL), is a great piece of software for getting the best experience for websites that weren’t necessarily built with cache-ability or high-volume traffic in mind.

At the same time though, getting the VCL just right to achieve the desired caching outcome for particular resources can be an exercise in reliably reproducing the expected requests and careful analysis of the varnish logs. It isn’t always possible to find an environment where this can be done with minimal distraction and impact on others.

At a company retreat in October my colleagues and I were discussing this scenario and one of us pointed out how JSFiddle provides a great experience for dealing with similar concerns albeit in the space of client-side JavaScript. I subsequently came to the conclusion that it should be possible build a similar tool for Varnish, so I did and you can use it now at www.vclfiddle.net and it is open-sourced on GitHub too.

VclFiddle enables you to specify a set of Varnish Configuration Language statements (including defining the backend origin server), and a set of HTTP requests and have them executed in a new, isolated Varnish Cache instance. In return you get the raw varnishlog output (including tracing) and all the response headers for each request, including a quick summary of which requests resulted in a cache hit or miss.

Each time a Fiddle is executed, a new Fiddle-specific URL is produced and displayed in the browser address bar and this URL can then be shared with anyone. So, much like JSFiddle, you can use VclFiddle to reproduce a difficult problem you might be having with Varnish and then post the Fiddle URL to your colleagues, or to Twitter, or to an online forum to seek assistance. Or you could share a Fiddle URL to demonstrate some cool behaviour you’ve achieved with Varnish.

VclFiddle is built with Sails.js (a Node.js MVC framework) and Docker. It is the power of Docker that makes it fast for the tool to spawn as many instances and versions of Varnish as needed for each Fiddle to execute and easy for people to add support for different Varnish versions. For example, it takes an average of 709 milliseconds to execute a Fiddle and it took my colleague Glenn less than an hour to add a new Docker image to provide Varnish 2.1 support.

The README in the VclFiddle repository has much more detail on how it works and how to use it. There is also a video demo, and a few example walk-throughs on the left-hand pane of the VclFiddle site. I hope that, if you’re a Varnish user you’ll find VclFiddle useful and it will become a regular tool in your belt. If you’re not familiar with Varnish Cache, perhaps VclFiddle will provide a good introduction to its capabilities so you can adopt it to optimize your web application. In any case, your feedback is welcome by contacting me, the @vclfiddle Twitter account, or via GitHub issues.

Command line parsing in Windows and Linux

I have been working almost completely on the Linux platform for the last six months as part of my new job. While so much is new and different from the Windows view of the world, there is also a significant amount that is the same, not surprisingly given the hardware underneath is common to both.

Just recently, while working on a new open source project, I discovered a particular nuance in a behavioural difference at the core of the two platforms. This difference is in how a new process is started.

When one process wants to launch another process, no matter which language you’re developing with, ultimately this task is performed by an operating system API. On Windows it is CreateProcess in kernel32.dll and on Linux it is execve (and friends), typically combined with fork.

The Windows API call expects a single string parameter containing all the command-line arguments to pass to the new process, however the Linux API call expects a parameter with an array of strings containing one command-line argument in each element. The key difference here is in where the responsibility lies for tokenising a string of arguments into the array ultimately consumed in the new process’ entry point, commonly the “argv” array in the “main” function found in some form in almost every language.

On Windows it is the new process, or callee, that needs to tokenise the arguments but the standard C library will normally handle that, and for other scenarios the OS provides CommandLineToArgvW in shell32.dll to do the same thing.

On Linux though it is the original process, or caller, that needs to tokenise the arguments first. Often in Linux it is the interactive shell (eg bash, ksh, zsh) that has its own semantics for handling quoting of arguments, variable expansion, and other features when tokenising a command-line into individual arguments. However, at least from my research, if you are developing a program on Linux which accepts a command-line from some user input, or is parsing an audit log, there is no OS function to help with tokenisation – you need to write it yourself.

Obviously, the Linux model allows greater choice in the kinds of advanced command-line interpretation features a shell can offer whereas Windows provides a fixed but consistent model to rely upon. This trade-off embodies the fundamental mindset differences between the two platforms, at least that is how it seems from my relatively limited experience.

PowerShell starts to blur the lines somewhat on the Windows platform as it has its own parsing semantics yet again but this applies mostly to calling Cmdlets which have a very different contract from the single entry point of processes. PowerShell also provides a Parser API for use in your own code.

New Job, New Platform

After about five and a half years I have resigned from my job with Readify. I have had a great time working for Readify as a software developer, a consultant, an ALM specialist, and an infrastructure coder. Had a new opportunity not presented itself I could have easily continued working for Readify for years to come. The decision to leave was definitely not easy.

Over the last 16 years working as an IT professional I’ve had the opportunity to gain experience with almost all aspects of software development, system administration, networking, and security but all of it on the Microsoft platform. I did do some work with PERL and PHP on Apache and MySQL back in the late 90s (like everyone did I’m sure) but I haven’t spent any quality time with Linux or Mac OS X since.

Starting on June 10th this year (2014) I will begin a new job with Squixa. Squixa provide a set of services for improving the end-user performance of existing web sites and exposing analytics to the web site’s owners. Squixa’s implementation currently involves very few Microsoft technologies, if any. Subsequently my future includes the exciting experience of learning a new set of operating systems, development languages, web servers, database systems, build tools, and so on.

I still have a passion for PowerShell and I feel that the direction Microsoft is heading with Azure, Visual Studio Online, and Project K is exciting and promises to become a much better platform than it is today so I will continue to stay informed of new developments. However, aside from small hobby projects, most of my time, effort, and daily challenges will come from the *nix world and future blog posts will likely reflect this.

Queue a Team Build from another and pass parameters

I have previously blogged about queuing a new Team Build at the successful completion of another Team Build for Team Foundation Server 2010. Since then I’ve had a few people ask how to queue a new Team Build and pass information into the new Team Build via the build process parameters. Recently I’ve needed to implement this exact behaviour for a client, and with TFS 2013 which has quite different default build process templates, so I thought I’d share it here.

In my situation I’m building on top the default TfvcTemplate.12.xaml process but the same approach can be easily applied to the Git build templates too. To begin, I have added two build process parameters to the template:

  1. Chained Build Definition Names – this is an optional array of strings which refer to the list of Build Definitions that should be queued upon successful completion of the current build. All the builds will be queued immediately and will execute as the controller and agents are available. The current build does not wait for the completion of the builds it queues. My simple implementation only supports queuing builds within the same Team Project.
  2. Source BuildUri – this is a single, optional, string which will accept the unique Team Build identifier of the previous build that queued it – this is not intended to be specified by a human but could be. When empty, it is ignored. However, when provided by a preceding build, this URI will be used to retrieve the Build Number and Drop Location of that preceding build and these values, plus the URI, will be made available to the projects and scripts executed within the new build. Following the new Team Build 2013 convention, these values are passed as environment variables named:
    • TF_BUILD_SOURCEBUILDURI
    • TF_BUILD_SOURCEBUILDNUMBER
    • TF_BUILD_SOURCEDROPLOCATION

The assumption is that a build definition based on my “chaining” template will only queue other builds based on the same template, or another template which also accepts a SourceBuildUri parameter. This also means that builds can be chained to any depth, each passing the BuildUri of itself to the next build in the chain.

The projects and scripts can use the TF_BUILD_SOURCEDROPLOCATION variable to access the output of the previous build – naturally UNC file share drops are easier to consume than drops into TFS itself. Also the TF_BUILD_SOURCEBUILDURI means that the TFS API can be used to query every aspect of the preceding build, notably including the Information Nodes.

Prior to TFS 2012, queuing a new build from the workflow and passing parameters would have required a custom activity. However, in Team Build 2012 and 2013, Windows Workflow 4.0 is used which includes a new InvokeMethod activity making it possible to add items to the Process Parameters dictionary directly from the XAML.

The final XAML for the Build Process Template with support for queuing and passing parameters is available as a Gist. If you’d like to be able to integrate the same functionality with your own Team Build 2013 template you can see the four discrete edits I made to the default TfvcTemplate.12.xaml file from TFS 2013 in the Gist revisions.

When a build using this chaining template queues another build it explicitly sets the RequestedFor property to the same value as the current build so that the chain of builds will show in the My Builds view of the user who triggered the first build.

In my current implementation, the SourceBuildUri passed to each queued build is the URI of the immediately preceding build, but it some cases it may be more appropriate to propagate the BuildUri of the original build that triggered the entire chain. This would be a somewhat trivial change to the workflow for whomever needs this behaviour instead.

Effectively comparing Team Build Process Templates

I always prefer implementing .NET build customizations through MSBuild and I avoid modifying the Windows Workflow XAML files used by Team Build. However, some customizations are best implemented in the Team Build process, like chaining builds to execute in succession and pass information between them. As a consultant specializing in automated build an deployment I also spend a lot of time understanding Workflow customizations implemented by others.

For me the easiest way to understand the customizations implemented in a particular Team Build XAML file is to use a file differencing tool to compare the current workflow to a previous version of the workflow, or even to compare it to the default Team Build template it was based on. Unfortunately, the Windows Workflow designer in Visual Studio litters the XAML file with a lot of view state, obscuring the intended changes to the build process amongst irrelevant designer-implementation concerns.

To address this problem, I wrote a PowerShell script (available as a GitHub Gist) which removes all the elements and attributes from the XAML file which are known to be unimportant to the process it describes. Conveniently, the XAML file itself lists the set of XML namespace prefixes that can be safely removed in an mc:Ignorable attribute on the root document element.

Typically I use my XAML cleaning PowerShell script before each check-in to ensure the source control history stays clean but I have also used it on existing XAML files created by others to canonicalize them before opening them in a diff tool.

Using the script is as simple as:

.\Remove-IgnoreableXaml.ps1 -Path YourBuildTemplate.xaml


Or, if you don’t want to overwrite the file in place, specify an alternate destination:

.\Remove-IgnoreableXaml.ps1 -Path YourBuildTemplate.xaml -Destination YourCleanBuildTemplate.xaml


PowerShell Select-Xml versus Get-Content

In PowerShell, one of the most common examples you will see for parsing an XML file into a variable uses the Get-Content cmdlet and the cast operator, like this:

$Document = [xml](Get-Content -Path myfile.xml)

The resulting type of the $Document variable is an instance of System.Xml.XmlDocument. However, there is another approach to get the same, or better, result using the Select-Xml cmdlet:

$Document = ( Select-Xml -Path myfile.xml -XPath / ).Node

Sure, using the second variant is slightly longer, but with an important benefit over the first, and it’s not performance related.

In the first example, the file is first read into an array of strings and then cast. The casting operation (implemented by System.Management.Automation.LanguagePrimitives.ConvertToXml) is using an XmlReaderSettings instance with the IgnoreWhitespace property set to true and an XmlDocument instance with the PreserveWhitespace property set to false.

In the second example, the file is read directly into an XmlDocument (implemented by System.Management.Automation.InternalDeserializer.LoadUnsafeXmlDocument) using an XmlReaderSettings instance with the IgnoreWhitespace property set to false and an XmlDocument instance with the PreserveWhitespace property set to true – the opposite values of the first example.

The Select-Xml approach won’t completely preserve all the original formatting from the source file but it preserves much more than the Get-Content approach will and I’ve found this extremely useful when bulk updating version controlled XML files with a PowerShell script and wanting the resulting file diff to show the intended change and not be obscured by formatting changes.

You could construct the XmlDocument and XmlReaderSettings directly in PowerShell but not in so few characters. You can also load the System.Xml.Linq assembly and use the XDocument class which appears to give slightly better formatting consistency again but it’s still not perfect and PowerShell doesn’t provide the same quick access to elements and attributes as properties on the object.